The question was: if I want to have a stand-alone version of OpenNMT to run on Windows, without any manual preparations or installations on the target machine, and does not connect to the Internet for Machine Translation, what are my options to achieve this?
Note: This post is somehow old, it uses OpenNMT-py 0.9.1, and currently applies only to Windows. If you want to develop a web interface or a stand-alone application on Windows, Linux or Mac, check the following up-to-date options:
After some research, I finally managed to achieve progress to create a Translator GUI for Windows, using Python Tkinter, PyInstaller, NSIS and the PyTorch version of OpenNMT.
Purpose
Creating a stand-alone executable of OpenNMT-py on Windows that requires the minimal technical experience to install and use, and no Internet connection, for Machine Translation.
Outcome
A proof-of-concept version can be downloaded here.
Tested on Windows 7 and Windows 10. Support for 64-bit version of Windows only (PyTorch works on Python 64-bit only).
The executable can be used to locally translate files, using a local pre-trained model file generated by OpenNMT-py Neural Machine Translation framework.
How it works
Installation
After downloading and launching the installer, it will copy the files to the “Program Files” folder. When the installer finishes, there will be a shortcut on the Desktop called “translate-gui”.
Usage
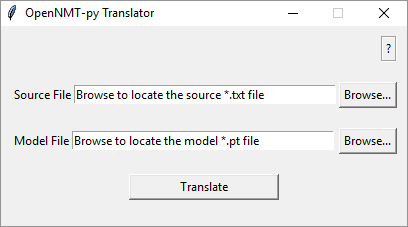
Running the shortcut “translate-gui” (which refers to translate-gui.exe), this window opens.
- Select the source file (*.txt)
- Select the model file (*.pt)
- Click “Translate”.
Note: For a quick test, you can download this test source file (right-click > Save link as) and this test model file.
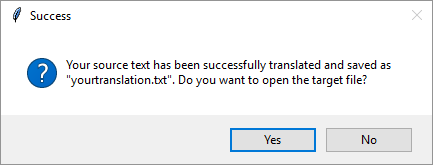
If everything works fine, it should create the translation file “youtranslation.txt” on the Desktop. Responding with “Yes” to this prompt message should open the translation TXT file in NotePad.
Uninstallation
To uninstall, simply delete the folder “translate-gui” from the “Program Files” folder.
Changes in the OpenNMT-py Code
Simple use of the same arguments; no serious changes.
1- onmt/opts.py
For the arguments -src and -model, changing the attribute required=True to required=False
group.add('--src', '-src', required=False,
    help="Source sequence to decode (one line per "
        "sequence)")
group.add('--model', '-model', dest='models', metavar='MODEL',
    nargs='+', type=str, default=[], required=False,
    help="Path to model .pt file(s). "
        "Multiple models can be specified, "
        "for ensemble decoding.")
2- translate.py
Assigning values from the Tkinter GUI to the following variables:
opt.src(source file path – string)opt.models(model file path – list of strings)opt.output(target file path – string)
For testing purposes, you can hardcode the values to get an idea how it works (without a GUI).
if name == "main":
    parser = _get_parser()
    opt = parser.parse_args()

    # edits
    opt.src = r"D:\Users\yasmin\output\source.txt"
    opt.models = [r"D:\Users\yasmin\output\test_model.pt"]
    opt.output = "yourtranslation.txt"

main(opt)
However, in the actual file, I replaced this with a function (e.g. go)
def go():
    parser = _get_parser()
         opt = parser.parse_args()

    try:
             opt.src = file_source
             opt.models = [file_model]
        opt.output = "yourtranslation.txt"

        main(opt)

        success = messagebox.askyesno('Success', 'Your source text has been successfully translated and saved as "yourtranslation.txt". Do you want to open the target file?')
        if success == True:
            webbrowser.open("yourtranslation.txt")
    except:
             messagebox.showerror('Error', 'Make sure you select the right Source and Model files.')
… and then assigned this go function to the attribute command of the “Translate” button in the GUI.
btn_translate = Button(frame3, text="Translate", width=20, highlightbackground="#BBCAE8", command=go).pack(padx=1)
Note that the variables file_source and file_model get their values from the GUI.
Final minimum working example can be found here.
Notes on PyInstaller and NSIS
PyInstaller freezes (packages) Python applications into stand-alone executables. NSIS is an open-source tool to create Windows installers. Here are some notes on using them:
- Installing PyInstaller is straightforward through using this command in your CMD/Terminal:
pip3 install pyinstalleror through installing Auto PY to EXE. - Consider bundling on Windows 7 and then testing on Windows 10. Otherwise, you might have to deal with some Windows dependencies.
- To use PyInstaller, specify the Python file name and the argument
-wto hide the console window:pyinstaller -y -w "yourfile.py" - At this stage, you created a folder including all the dependencies and an *.exe inside it that will run the Python file.
Do NOT use the “onefile” argument
-Fof PyInstaller which creates a one-file bundled executable, i.e. instead of having the above-mentioned folder, you will have a big *.exe for the whole thing. Why not? This external *.exe is like an archive that extracts the packaged files (including the internal *.exe) to a temporary directory every time you run it, which takes a long time due to the huge file size of PyTorch and other dependencies. Instead, use NSIS to create an installer which will extract the files only once. - NSIS can be downloaded, installed and used on Windows like any application.
- Before using NSIS, compress the contents of the “dist” directory created by PyInstaller into a *.zip archive using any tool like 7-Zip or WinZip.
- Launch NSIS, click “Installer based on a .ZIP file”, and click “Open” to locate the package *.zip file you have just created.
- If you want to make the files installed (extracted) to the “Program Files” of the target user, in the “Default Folder” enter
$PROGRAMFILES - If you want to add a shortcut to the internal *.exe file on the Desktop after installation, you can add something like this to the file “Modern.nsh” at:
"C:\Program Files\NSIS\Contrib\zip2exe\". Depending on your OS, the path could be at “Program Files (x86)”. I just added these lines at the end of the file. Note that the exe path should be consistent with the path you selected under NSIS’s “Default Folder” drop-down menu, the folder name, and the exe file name.
Section "Desktop Shortcut" SectionX
    SetShellVarContext current
    CreateShortCut "$DESKTOP\translate-gui.lnk" "$PROGRAMFILES\translate-gui\translate-gui.exe"
SectionEnd
- Finally, click the NSIS “Generate” button, which will create the *.exe installer that can be shipped to other Windows machines.
Future Work
- Adding more OpenNMT-py translation options (and maybe training options) to the GUI.
- Improving the user experience during installation, usage, and uninstallation.
- Reducing the required space by removing unnecessary dependencies.
- Testing the same approach for the TensorFlow version, OpenNMT-tf.